One of the best things you can do to improve the performance of your Rails application is implementing a CDN to serve up your content. Primarily assets and static images. Using a service like Amazon CloudFront allows you to take advantage of powerful edge caching servers that are physically distributed around the world in different geographic locations. By using these edge locations you’re able to take advantage of less physical distance between your assets and your end user. These servers also include large amounts of bandwidth and are traditionally very performant. A CloudFront distribution can even be configured to Gzip your assets before serving them up (reducing file size significantly).
This post will go over the implementation of CloudFront in a Rails application, both for static assets and uploaded content. In this application, we already were serving our static assets and uploaded images from Amazon S3. We opted to add CloudFront to improve performance and decrease site load times for our customers.
How does it work?
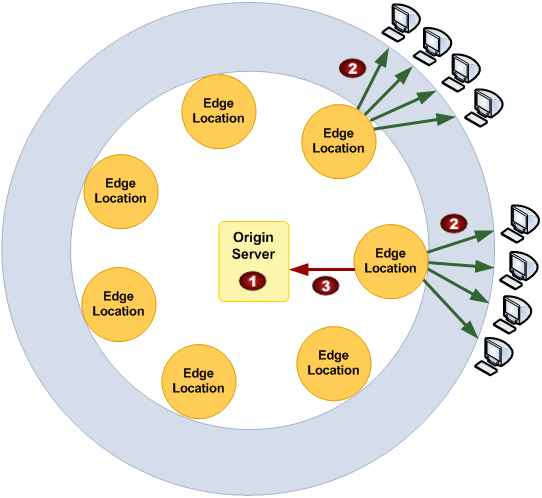 Image shamelessly borrowed from Amazon
- The Origin Server stores your content, this can be any server. For this implementation though we’re going to be using Amazon S3 as our origin source for all of our CloudFront distributions.
- The end user makes a content request for a static asset on your site.
- If the CloudFront edge server has a copy of the requested asset, it will serve it up. If it doesn’t have a copy, it will pull the asset from the origin server and then cache the response based on the configuration of the CloudFront distribution. The default TTL for CloudFront is 1 day, maximum TTL is default of 1 year.
So CloudFront is a cache?
Basically, yes. It was specifically built to deliver content to end user devices as quickly as possible (and with as little latency as possible).
But how do we ensure that it’s always up to date?
There are two hard problems in software development:
- Naming Things
- Cache Invalidation
- Off by one errors
All joking aside, you want to make sure that your users are only getting served up fresh content. If there is outdated content being served up, you’ve already lost the CDN battle. Since we’re using Rails, we’ll leverage the Asset Pipeline for fingerprinting our files. Fingerprinted files will ensure that their filenames are always significantly different whenever a file is replaced, rotating filenames are critical as CloudFront requests are cached for so long.
AWS Configuration
The first thing we’ll need to do is create a CloudFront distribution based on our Amazon S3 bucket. Log into the AWS console, select “Services”, then choose “CloudFront” under “Networking & Content Delivery”. On the Distributions page, you’ll need to select “Create Distribution”, then when prompted choose a “Web” distribution.
You’ll be presented with the “New Web Distribution” screen, in this case we’re using our S3 bucket as our origin. When you click into the origin field, it will autofill your various S3 buckets. Choose the appropriate S3 bucket for your distribution.
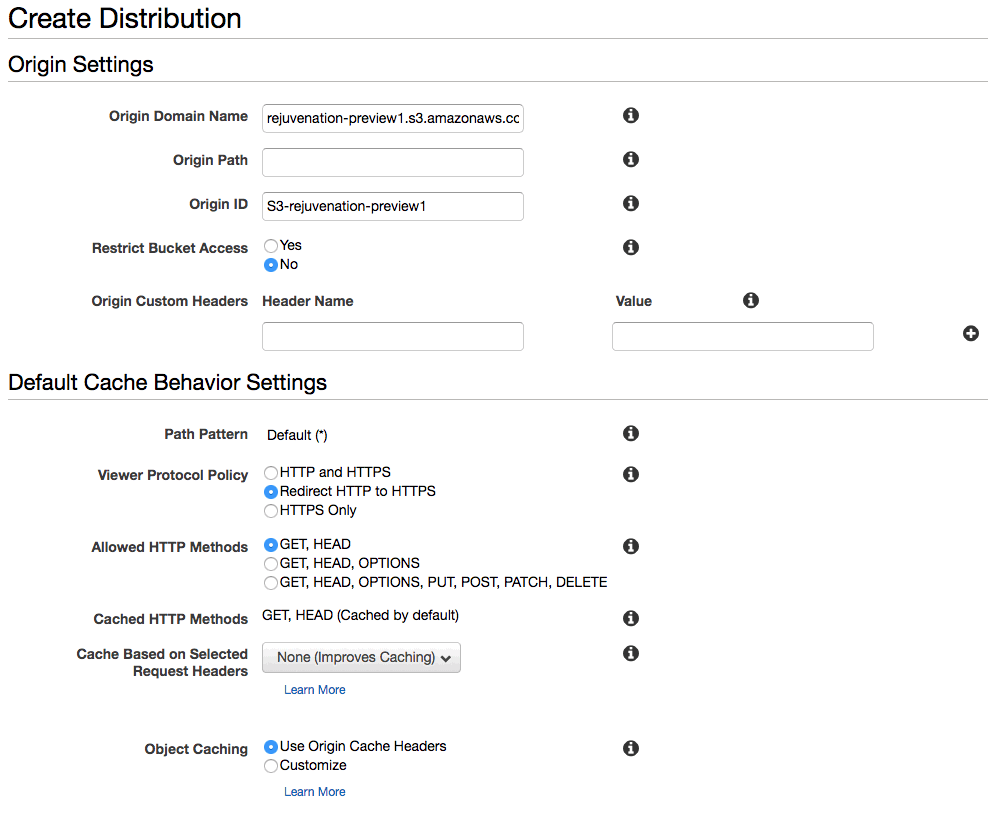 We’re basing this distribution off of the
 rejuvenation-preview1 S3 bucket
- Ensure that “Restrict Bucket Access” is set to “No”. These are public assets, be sure that you’re using a public S3 bucket for this task. It shouldn’t contain any information that you wouldn’t leave publicly accessible.
- Ensure that redirect HTTP to HTTPS is enabled, because you’re using HTTPS on your site aren’t you?
- We don’t need CloudFront to handle requests aside from
GETorHEAD, those defaults are fine. - Anything that said “Improves Caching” I left set to the default value
- Change “Compress Objects Automatically” to “Yes”, this ensures that our compressible assets get Gzipped before being served.
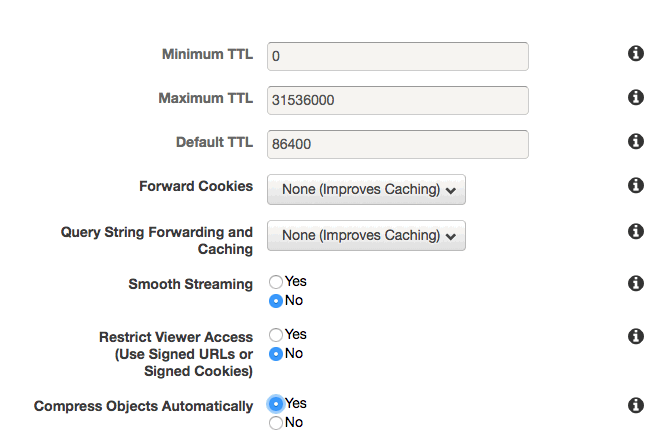
- If you want to customize your TTL values, you could do that now. However defaults seemed fine for us.
Distribution Settings
Just a few more fields to fill out and set!
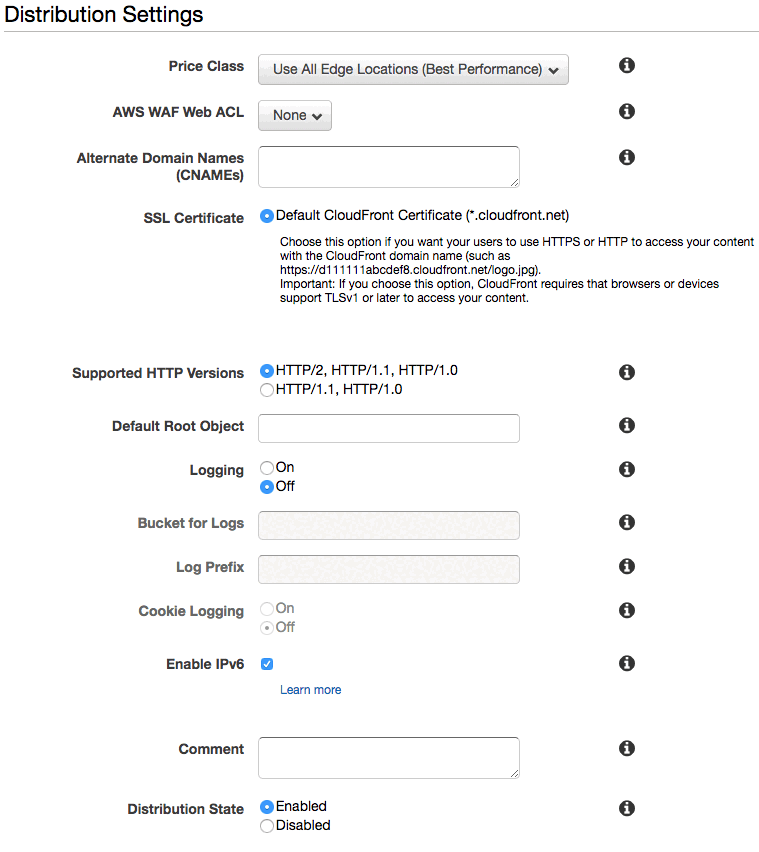
- In this example, we’re going to use the default CloudFront domain names, they look like this: https://sdklfjlksd.cloudfront.net
- Because we’re using AWS domain names we already get HTTPS for free, and don’t have to mess with CNAME records, importing certificates, or anything else.
- We also choose “Use All Edge Locations”, if you wanted to serve only a small subset of customers you could change these options.
- We disabled logging, and enabled IPv6. These options should be fairly self-explaining.
- Lastly, “Distribution State” should be set to “On” - otherwise it won’t work. (Who knew!)
- Choose the “Create Distribution” button in the lower right hand corner.
The Application Configuration
I’m using the following gems/libraries to enable the asset pipeline. These should all be present in your application, and should all be configured with correct credentials. You’ll want to have your access_key_id and your secret_access_key ready to go.
- Rails w/Sprockets + Asset Pipeline (this is kind of a given)
fog-aws- GitHubcarrierwave- GitHubasset_sync- GitHub- S3 Credentials configured in a YAML file
config/s3.yml - Capistrano for deployments (including pre-compiling assets)
Asset Pipeline
The following is the contents of config/initializers/assets.rb this is one of the caveats we found after migrating from Rails 3.x to Rails 4.x; the file wasn’t originally present with Rails 3.2 and needed to be added.
# config/initializers/assets.rb
# Be sure to restart your server when you modify this file.
# Note that environment settings take precedence over these settings
# Version of your assets, change this if you want to expire all your assets.
Rails.application.config.assets.version       = '1.1.1.1.1'
Rails.application.config.assets.precompile   += %w(admin/application.js admin/application.css print.js print.css)
Rails.application.config.assets.enabled       = true
Rails.application.config.assets.js_compressor = :uglifier
Rails.application.config.assets.compress      = true
There are also very important directives that need set in your various environment files. We had to set these in both places config/initializers/assets.rb and also config/environments/production.rb. This might not be the common case, but if you’re having issues I’d check that first.
# config/environments/production.rb

config.assets.js_compressor = :uglifier
config.serve_static_files   = false
config.assets.compress      = true
config.assets.digest        = true
Tell Rails to use CloudFront
Arguably the most important configuration step is setting the asset_host for requests coming into Rails; this is where we use our CloudFront URL to leverage the CDN. In our case we built a small Ruby method to take care of determining if we had a CloudFront URL set for each environment, this gave us some simple methods (like in the following example) that allow us to fall back to Amazon S3 if there isn’t a CloudFront domain configured for the specific environment. CloudFront domain names always look like this: d3hms97hmzra3v.cloudfront.net. You don’t typically need a complicated method for determining the URL to use, just setting it for each environment is perfectly acceptable in most cases.
# config/environments/production.rb
config.action_controller.asset_host = ->(*args) do
  if Rejuvenation::Cloudfront.url
    Rejuvenation::Cloudfront.url
  else
    "//#{AssetSync.config.fog_directory}.s3.amazonaws.com"
  end
end

config.action_mailer.asset_host = ->(*args) do
  if Rejuvenation::Cloudfront.url
    Rejuvenation::Cloudfront.url
  else
    "//#{AssetSync.config.fog_directory}.s3.amazonaws.com"
  end
end
AssetSync
We’ll be using asset sync to keep our S3 bucket up to date with our assets, most of the guides I read with implementing CloudFront didn’t use this option but this was useful for our use case (as we were already persisting assets on S3). AssetSync will automatically sync your assets as part of the precompile process. Here’s the initializer file for it.
# config/initializers/asset_sync.rb
s3config = YAML.parse(File.join(Rails.root, 'config', 's3.yml'))[Rails.env]

AssetSync.configure do |config|
  config.fog_provider          = 'AWS'
  config.aws_access_key_id     = s3config[:access_key_id]
  config.aws_secret_access_key = s3config[:secret_access_key]
  config.fog_directory         = s3config[:bucket]
  # Increase upload performance by configuring your region
  config.fog_region            = s3config[:region]
  #
  # NOTE: if you want asset_sync to clean up your bucket
  # Change this value to "delete"
  config.existing_remote_files = "keep"
  #
  # Use the Rails generated 'manifest.yml' to list files to
  # upload instead of searching the assets directory.
  config.manifest = true
  #
  # Fail silently.  Useful for environments such as Heroku
  # config.fail_silently = true
end
CarrierWave
CarrierWave is an excellent solution for persisting static assets that are uploaded by end users, in our case we use CarrierWave to persist images for products and other database-backed content models. Configuring CarrierWave to use CloudFront and S3 is a fairly trivial task. The only CloudFront specific configuration value is the config.asset_host setting. This will be set to your CloudFront domain name (this is accessible in your CloudFront distribution settings); CloudFront domain names always look like this: d3hms97hmzra3v.cloudfront.net
# config/initializers/carrierwave.rb
s3config = Rejuvenation.load_config_file(File.join(Rails.root, 'config', 's3.yml'))
CarrierWave.configure do |config|
  config.fog_credentials = {
    provider:              'AWS',
    aws_access_key_id:     s3config[:access_key_id],
    aws_secret_access_key: s3config[:secret_access_key],
    region:                s3config[:region]
  }
  config.fog_directory = s3config[:bucket]
  config.fog_public    = true

  config.asset_host = "https://d3hms97hmzra3v.cloudfront.net"

  # disable Carrierwave storage in S3 when in test environment
  if Rails.env.test? or Rails.env.cucumber?
    config.storage = :file
    config.enable_processing = false
  else
    config.storage = :fog
  end
end
Notes about other environments
Important! The code above would cause all of your environments to use the same CloudFront URL, which is probably not the case. Typically you’d want to separate out different environments into different buckets. In our case we implemented a simple Ruby class to handle determining the environment to CloudFront URL mapping.
# config/initializers/carrierwave.rb
...
if Rejuvenation::CloudFront.url
  # CarrierWave defaults to S3 URLs so this is safe to leave unset if
  # there isn't a CloudFront URL.
  config.asset_host = Rejuvenation::CloudFront.url
end
...
Other Caveats
- If you change an image for model that uses CarrierWave as an uploader and the filename does not change, it will take a significant amount of time for CloudFront to naturally expire the cached content. The new image would never be displayed on the site until manual invalidation or until a new image filename was used.
- If you’re using JsRoutes and you add new routes. You’ll need to be sure to destroy any assets that are cached during the precompile process, otherwise your
routes.jsfile will not be updated. - We noticed some slowness during testing, but overall it seemed more performant than S3.
- When we eventually switched to CloudFront we were already using Amazon S3 to store all of our uploaded assets. This configuration we were able to implement would allow us to use S3 or CloudFront with some simple mapping changes.
- Simply removing the value for an environment would cause it to “fall back” to serving assets through S3.
# config/cloudfront.yml
development: 'd3elyzadx9w64l.cloudfront.net'
production:  'abcdzzzzazzzzz.cloudfront.net'
...
Conclusion
This was a large performance increase for our specific application, I imagine that most larger Rails applications with any number of static assets would benefit from a CloudFront distribution. Implementing CloudFront by leveraging S3 and additional libraries significantly simplified the process of implementation.
You could also use your Rails application server as the origin for your CloudFront distribution. This would be useful for smaller applications that do not already leverage S3. Since CloudFront will cache the response from your origin server for a significant amount of time, your Rails application server shouldn’t have to do too much work to serve up the assets on their initial cache miss from CloudFront.
If you inspect the headers for a CloudFront file you can see if the request was a hit or a miss from CloudFront.